Modifying the configuration of KUMA
The following KUMA configuration changes can be performed.
- Extending an all-in-one installation to a distributed installation.
To expand an all-in-one installation to a distributed installation:
- Create a backup copy of KUMA.
- Remove the pre-installed correlator, collector, and storage services from the server.
- In the KUMA web interface, under Resources → Active services, select a service and click Copy ID. On the server where the services were installed, run the service removal command:
sudo /opt/kaspersky/kuma/kuma <collector/correlator/storage> --id <service ID copied from the KUMA web interface> --uninstallRepeat the removal command for each service.
- Then remove the services in the KUMA web interface:
As a result, only the KUMA Core remains on the initial installation server.
- In the KUMA web interface, under Resources → Active services, select a service and click Copy ID. On the server where the services were installed, run the service removal command:
- Prepare the distributed.inventory.yml inventory file and in that file, specify the initial all-in-one initial installation server in the
kuma_coregroup.In this way, the KUMA Core remains on the original server, and you can deploy the other components on other servers. Specify the servers on which you want to install the KUMA components in the inventory file.
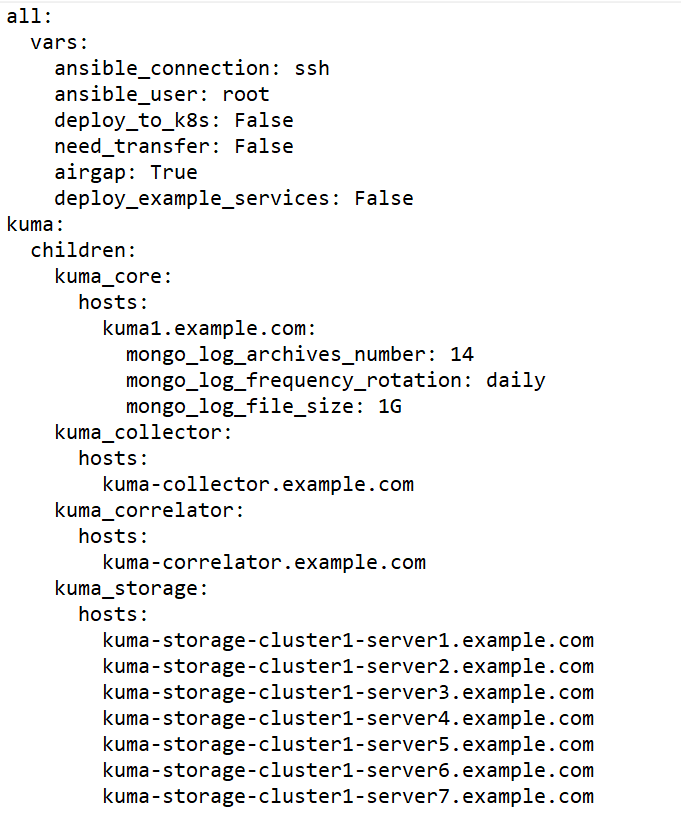
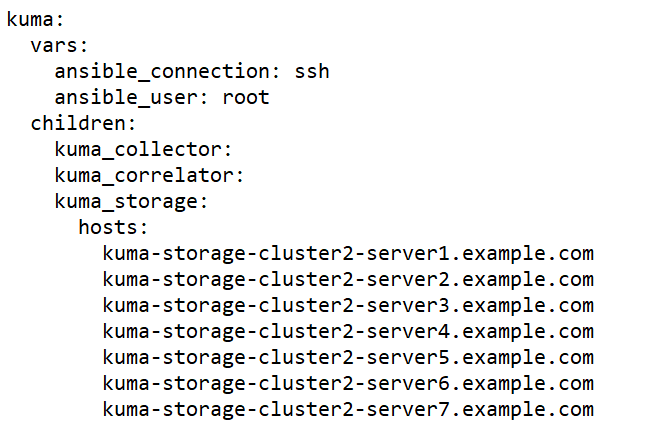
Sample inventory file for expanding an all-in-one installation to a distributed installation
- Create and install the storage, collector, correlator, and agent services on other machines.
- After you specify the settings for all sections in the distributed.inventory.yml inventory file, run the installer on the test machine.
sudo ./install.sh distributed.inventory.ymlRunning the command causes the files necessary to install the KUMA components (storages, collectors, correlators) to appear on each target machine specified in the distributed.inventory.yml inventory file.
- Create storage, collector, and correlator services.
- After you specify the settings for all sections in the distributed.inventory.yml inventory file, run the installer on the test machine.
The expansion of the installation is completed.
- Adding servers for collectors to a distributed installation.
The following instructions show how to add one or more servers to an existing infrastructure and then install collectors on these servers to balance the load. You can use these instructions as an example and adapt them to your requirements.
To add servers to a distributed installation:
- Ensure that the target machines meet hardware, software, and installation requirements.
- On the test machine, go to the directory with the unpacked KUMA installer by running the following command:
cd kuma-ansible-installer - Copy the expand.inventory.yml.template template to create an inventory file called expand.inventory.yml:
cp expand.inventory.yml.template expand.inventory.yml - Edit the settings in the expand.inventory.yml inventory file and specify the servers that you want to add in the kuma_collector section.
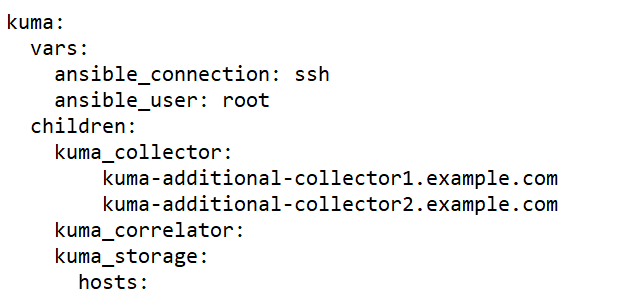
Sample expand.inventory.yml inventory file for adding collector servers
- On the test machine start expand.inventory.playbook by running the following command as root in the directory with the unpacked installer:
PYTHONPATH="$(pwd)/ansible/site-packages:${PYTHONPATH}" python3 ./ansible/bin/ansible-playbook -i expand.inventory.yml expand.inventory.playbook.ymlRunning this command on each target machine specified in the expand.inventory.yml inventory file creates files for creating and installing the collector.
- Create and install the collectors. A KUMA collector consists of a client part and a server part, therefore creating a collector involves two steps.
- Creating the client part of the collector, which includes a set of resources and the collector service.
To create a set of resources for a collector, in the KUMA web interface, under Resources → Collectors, click Add collector and edit the settings. For more details, see Creating a collector.
At the last step of the configuration wizard, after you click Create and save, a resource set for the collector is created and the collector service is automatically created. The command for installing the service on the server is also automatically generated and displayed on the screen. Copy the installation command and proceed to the next step.
- Creating the server part of the collector.
- On the target machine, run the command you copied at the previous step. The command looks as follows, but all parameters are filled in automatically.
sudo /opt/kaspersky/kuma/kuma <storage> --core https://<KUMA Core server FQDN>:<port used by KUMA Core for internal communication (port 7210 by default)> --id <service ID copied from the KUMA web interface> --installThe collector service is installed on the target machine. You can check the status of the service in the web interface under Resources → Active services.
- Run the same command on each target machine specified in the expand.inventory.yml inventory file.
- Creating the client part of the collector, which includes a set of resources and the collector service.
- Specify the added servers in the distributed.inventory.yml inventory file so that it has up-to-date information in case of a KUMA update.
Servers are successfully added.
- Adding servers for correlators to a distributed installation.
The following instructions show how to add one or more servers to an existing infrastructure and then install correlators on these servers to balance the load. You can use these instructions as an example and adapt them to your requirements.
To add servers to a distributed installation:
- Ensure that the target machines meet hardware, software, and installation requirements.
- On the test machine, go to the directory with the unpacked KUMA installer by running the following command:
cd kuma-ansible-installer - Copy the expand.inventory.yml.template template to create an inventory file called expand.inventory.yml:
cp expand.inventory.yml.template expand.inventory.yml - Edit the settings in the expand.inventory.yml inventory file and specify the servers that you want to add in the kuma_correlator section.
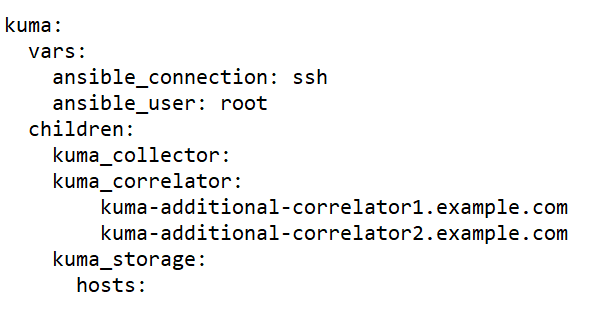
Sample expand.inventory.yml inventory file for adding correlator servers
- On the test machine, start expand.inventory.playbook by running the following command as root in the directory with the unpacked installer:
PYTHONPATH="$(pwd)/ansible/site-packages:${PYTHONPATH}" python3 ./ansible/bin/ansible-playbook -i expand.inventory.yml expand.inventory.playbook.ymlRunning this command on each target machine specified in the expand.inventory.yml inventory file creates files for creating and installing the correlator.
- Create and install the correlators. A KUMA correlator consists of a client part and a server part, therefore creating a correlator involves two steps.
- Creating the client part of the correlator, which includes a set of resources and the correlator service.
To create a resource set for a correlator, in the KUMA web interface, under Resources → Correlators, click Add correlator and edit the settings. For more details, see Creating a correlator.
At the last step of the configuration wizard, after you click Create and save, a resource set for the correlator is created and the correlator service is automatically created. The command for installing the service on the server is also automatically generated and displayed on the screen. Copy the installation command and proceed to the next step.
- Creating the server part of the correlator.
- On the target machine, run the command you copied at the previous step. The command looks as follows, but all parameter values are assigned automatically.
sudo /opt/kaspersky/kuma/kuma <storage> --core https://<KUMA Core server FQDN>:<port used by KUMA Core for internal communication (port 7210 by default)> --id <service ID copied from the KUMA web interface> --installThe correlator service is installed on the target machine. You can check the status of the service in the web interface under Resources → Active services.
- Run the same command on each target machine specified in the expand.inventory.yml inventory file.
- Creating the client part of the correlator, which includes a set of resources and the correlator service.
- Specify the added servers in the distributed.inventory.yml inventory file so that it has up-to-date information in case of a KUMA update.
Servers are successfully added.
- Adding servers to an existing storage cluster.
The following instructions show how to add multiple servers to an existing storage cluster. You can use these instructions as an example and adapt them to your requirements.
To add servers to an existing storage cluster:
- Ensure that the target machines meet hardware, software, and installation requirements.
- On the test machine, go to the directory with the unpacked KUMA installer by running the following command:
cd kuma-ansible-installer - Copy the expand.inventory.yml.template template to create an inventory file called expand.inventory.yml:
cp expand.inventory.yml.template expand.inventory.yml - Edit the settings in the expand.inventory.yml inventory file and specify the servers that you want to add in the 'storage' section. In the following example, the 'storage' section specifies servers for installing two shards, each of which contains two replicas. In the expand.inventory.yml inventory file, you must only specify the FQDN, the roles of shards and replicas are assigned later in the KUMA web interface by following the steps of the instructions. You can adapt this example to suit your needs.
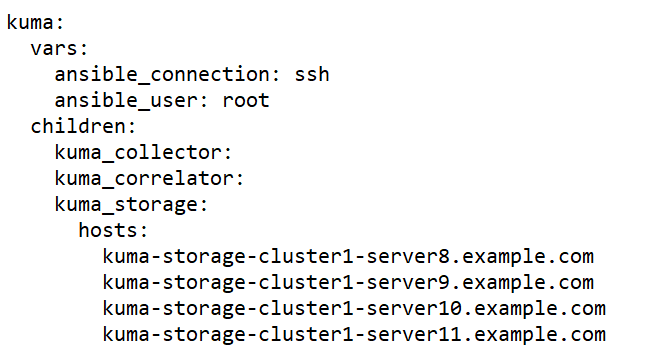
Sample expand.inventory.yml inventory file for adding servers to an existing storage cluster
- On the test machine, start expand.inventory.playbook by running the following command as root in the directory with the unpacked installer:
PYTHONPATH="$(pwd)/ansible/site-packages:${PYTHONPATH}" python3 ./ansible/bin/ansible-playbook -i expand.inventory.yml expand.inventory.playbook.ymlRunning this command on each target machine specified in the expand.inventory.yml inventory file creates files for creating and installing the storage. - You do not need to create a separate storage because you are adding servers to an existing storage cluster. You must edit the storage settings of the existing cluster:
- In the Resources → Storages section, select an existing storage and open the storage for editing.
- In the ClickHouse cluster nodes section, click Add nodes and specify roles in the fields for the new node. The following example shows how to specify identifiers to add two shards, containing two replicas each, to an existing cluster. You can adapt the example to suit your needs.
Example:
ClickHouse cluster nodes
<existing nodes>
FQDN: kuma-storage-cluster1server8.example.com
Shard ID: 1
Replica ID: 1
Keeper ID: 0
FQDN: kuma-storage-cluster1server9.example.com
Shard ID: 1
Replica ID: 2
Keeper ID: 0
FQDN: kuma-storage-cluster1server9.example.com
Shard ID: 2
Replica ID: 1
Keeper ID: 0
FQDN: kuma-storage-cluster1server10.example.com
Shard ID: 2
Replica ID: 2
Keeper ID: 0
- Save the storage settings.
Now you can create storage services for each ClickHouse cluster node.
- To create a storage service, in the KUMA web interface, in the Resources → Active services section, click Add service.
This opens the Choose a service window; in that window, select the storage you edited at the previous step and click Create service. Do the same for each ClickHouse storage node you are adding.
As a result, the number of created services must be the same as the number of nodes added to the ClickHouse cluster, that is, four services for four nodes. The created storage services are displayed in the KUMA web interface in the Resources → Active services section. Now storage services must be installed on each server by using the service ID.
- Now storage services must be installed on each server by using the service ID.
- In the KUMA web interface, in the Resources → Active services section, select the storage service that you need and click Copy ID.
The service ID is copied to the clipboard; you need it for running the service installation command.
- Compose and run the following command on the target machine:
sudo /opt/kaspersky/kuma/kuma <storage> --core https://<KUMA Core server FQDN>:<port used by KUMA Core for internal communication (port 7210 by default)> --id <service ID copied from the KUMA web interface> --installThe storage service is installed on the target machine. You can check the status of the service in the web interface under Resources → Active services.
- Run the storage service installation command on each target machine listed in the 'storage' section of the expand.inventory.yml inventory file, one machine at a time. On each machine, the unique service ID within the cluster must be specified in the installation command.
- In the KUMA web interface, in the Resources → Active services section, select the storage service that you need and click Copy ID.
- To apply changes to a running cluster, in the KUMA web interface, under Resources → Active services, select the check box next to all storage services in the cluster that you are expanding and click Update configuration. Changes are applied without stopping services.
- Specify the added servers in the distributed.inventory.yml inventory file so that it has up-to-date information in case of a KUMA update.
Servers are successfully added to a storage cluster.
- Adding an additional storage cluster.
The following instructions show how to add an additional storage cluster to existing infrastructure. You can use these instructions as an example and adapt them to your requirements.
To add an additional storage cluster:
- Ensure that the target machines meet hardware, software, and installation requirements.
- On the test machine, go to the directory with the unpacked KUMA installer by running the following command:
cd kuma-ansible-installer - Copy the expand.inventory.yml.template template to create an inventory file called expand.inventory.yml:
cp expand.inventory.yml.template expand.inventory.yml - Edit the settings in the expand.inventory.yml inventory file and specify the servers that you want to add in the 'storage' section. In the following example, the 'storage' section specifies servers for installing three dedicated keepers and two shards, each of which contains two replicas. In the expand.inventory.yml inventory file, you must only specify the FQDN, the roles of keepers, shards, and replicas are assigned later in the KUMA web interface by following the steps of the instructions. You can adapt this example to suit your needs.
Sample expand.inventory.yml inventory file for adding an additional storage cluster
- On the test machine, start expand.inventory.playbook by running the following command as root in the directory with the unpacked installer:
PYTHONPATH="$(pwd)/ansible/site-packages:${PYTHONPATH}" python3 ./ansible/bin/ansible-playbook -i expand.inventory.yml expand.inventory.playbook.ymlRunning this command on each target machine specified in the expand.inventory.yml inventory file creates files for creating and installing the storage. - Create and install a storage. For each storage cluster, you must create a separate storage, that is, three storages for three storage clusters. A storage consists of a client part and a server part, therefore creating a storage involves two steps.
- Creating the client part of the storage, which includes a set of resources and the storage service.
- To create a resource set for a storage, in the KUMA web interface, under Resources → Storages, click Add storage and edit the settings. In the ClickHouse cluster nodes section, specify roles for each server that you are adding: keeper, shard, replica. For more details, see Creating a set of resources for a storage.
The created set of resources for the storage is displayed in the Resources → Storages section. Now you can create storage services for each ClickHouse cluster node.
- To create a storage service, in the KUMA web interface, in the Resources → Active services section, click Add service.
This opens the Choose a service window; in that window, select the set of resources that you created for the storage at the previous step and click Create service. Do the same for each ClickHouse storage.
As a result, the number of created services must be the same as the number of nodes in the ClickHouse cluster, that is, fifty services for fifty nodes. The created storage services are displayed in the KUMA web interface in the Resources → Active services section. Now storage services must be installed to each node of the ClickHouse cluster by using the service ID.
- To create a resource set for a storage, in the KUMA web interface, under Resources → Storages, click Add storage and edit the settings. In the ClickHouse cluster nodes section, specify roles for each server that you are adding: keeper, shard, replica. For more details, see Creating a set of resources for a storage.
- Creating the server part of the storage.
- On the target machine, create the server part of the storage: in the KUMA web interface, in the Resources → Active services section, select the relevant storage service and click Copy ID.
The service ID is copied to the clipboard; you need it for running the service installation command.
- Compose and run the following command on the target machine:
sudo /opt/kaspersky/kuma/kuma <storage> --core https://<KUMA Core server FQDN>:<port used by KUMA Core for internal communication (port 7210 by default)> --id <service ID copied from the KUMA web interface> --installThe storage service is installed on the target machine. You can check the status of the service in the web interface under Resources → Active services.
- Run the storage service installation command on each target machine listed in the 'storage' section of the expand.inventory.yml inventory file, one machine at a time. On each machine, the unique service ID within the cluster must be specified in the installation command.
- Dedicated keepers are automatically started immediately after installation and are displayed in the Resources → Active services section with a green status. Services on other storage nodes may not start until services are installed for all nodes in that cluster. Up to that point, services can be displayed with a red status. This is normal behavior for creating a new storage cluster or adding nodes to an existing storage cluster. As soon as the command to install services on all nodes of the cluster is executed, all services acquire the green status.
- Creating the client part of the storage, which includes a set of resources and the storage service.
- Specify the added servers in the distributed.inventory.yml inventory file so that it has up-to-date information in case of a KUMA update.
An additional storage cluster is successfully added.
- Removing servers from a distributed installation.
To remove a server from a distributed installation:
- Remove all services from the server that you want to remove from the distributed installation.
- Remove the server part of the service. Copy the service ID in the KUMA web interface and run the following command on the target machine:
sudo /opt/kaspersky/kuma/kuma <collector/correlator/storage> --core https://<KUMA Core server FQDN>:<port used by KUMA Core for internal communication (port 7210 by default)> --id <service ID copied from the KUMA web interface> --install - Remove the client part of the service in the KUMA web interface in the Active services → Delete section.
The service is removed.
- Remove the server part of the service. Copy the service ID in the KUMA web interface and run the following command on the target machine:
- Repeat step 1 for each server that you want to remove from the infrastructure.
- Remove servers from the relevant sections of the distributed.inventory.yml inventory file to make sure the inventory file has up-to-date information in case of a KUMA update.
The servers are removed from the distributed installation.
- Remove all services from the server that you want to remove from the distributed installation.
- Removing a storage cluster from a distributed installation.
To remove one or more storage clusters from a distributed installation:
- Remove the storage service on each cluster server that you want to removed from the distributed installation.
- Remove the server part of the storage service. Copy the service ID in the KUMA web interface and run the following command on the target machine:
sudo /opt/kaspersky/kuma/kuma <storage> --id <service ID> --uninstallRepeat for each server. - Remove the client part of the service in the KUMA web interface in the Resources → Active services → Delete section.
The service is removed.
- Remove the server part of the storage service. Copy the service ID in the KUMA web interface and run the following command on the target machine:
- Remove servers from the 'storage' section of the distributed.inventory.yml inventory file to make sure the inventory file has up-to-date information in case of a KUMA update or a configuration change.
The cluster is removed from the distributed installation.
- Remove the storage service on each cluster server that you want to removed from the distributed installation.
- Migrating the KUMA Core to a new Kubernetes cluster.
Preparing the inventory file
When migrating the KUMA Core to a Kubernetes cluster, it is recommended to use the template file named k0s.inventory.yml.template when creating the inventory file.
The
kuma_core,kuma_ collector,kuma_correlator, andkuma_storagesections of your inventory file must contain the same hosts that were used when upgrading KUMA from version 2.0.x to version 2.1 or when performing a new installation of the application. In the inventory file, set thedeploy_to_k8s,need_transferandairgapparameters totrue. Thedeploy_example_servicesparameter must be set tofalse.Example inventory file with 1 dedicated controller and 2 worker nodes
all:vars:ansible_connection: sshansible_user: rootdeploy_to_k8s: Trueneed_transfer: Trueairgap: Truedeploy_example_services: Falsekuma:children:kuma_core:hosts:kuma.example.com:mongo_log_archives_number: 14mongo_log_frequency_rotation: dailymongo_log_file_size: 1Gkuma_collector:hosts:kuma.example.com:kuma_correlator:hosts:kuma.example.com:kuma_storage:hosts:kuma.example.com:shard: 1replica: 1keeper: 1kuma_k0s:children:kuma_control_plane_master:hosts:kuma2.example.com:ansible_host: 10.0.1.10kuma_control_plane_master_worker:kuma_control_plane:kuma_control_plane_worker:kuma_worker:hosts:kuma.example.com:ansible_host: 10.0.1.11extra_args: "--labels=kaspersky.com/kuma-core=true,kaspersky.com/kuma-ingress=true,node.longhorn.io/create-default-disk=true"kuma3.example.com:ansible_host: 10.0.1.12extra_args: "--labels=kaspersky.com/kuma-core=true,kaspersky.com/kuma-ingress=true,node.longhorn.io/create-default-disk=true"Migrating the KUMA Core to a new Kubernetes cluster
When the installer is started with this template file, it searches for the installed KUMA Core on all hosts where you intend to deploy worker nodes of the cluster. The found Core will be moved from the host to within the newly created Kubernetes cluster.
If the component is not detected on the worker nodes, a clean installation of the KUMA Core is performed in the cluster without migrating resources to it. Existing components must be manually rebuilt with the new Core in the KUMA web interface.
Certificates for collectors, correlators and storages will be re-issued from the inventory file for communication with the Core within the cluster. This does not change the Core URL for components.
On the Core host, the installer does the following:
- Removes the following systemd services from the host: kuma-core, kuma-mongodb, kuma-victoria-metrics, kuma-vmalert, and kuma-grafana.
- Deletes the internal certificate of the Core.
- Deletes the certificate files of all other components and deletes their records from MongoDB.
- Deletes the following directories:
- /opt/kaspersky/kuma/core/bin
- /opt/kaspersky/kuma/core/certificates
- /opt/kaspersky/kuma/core/log
- /opt/kaspersky/kuma/core/logs
- /opt/kaspersky/kuma/grafana/bin
- /opt/kaspersky/kuma/mongodb/bin
- /opt/kaspersky/kuma/mongodb/log
- /opt/kaspersky/kuma/victoria-metrics/bin
- Migrates data from the Core and its dependencies to a network drive within the Kubernetes cluster.
- On the Core host, it migrates the following directories:
- /opt/kaspersky/kuma/core
- /opt/kaspersky/kuma/grafana
- /opt/kaspersky/kuma/mongodb
- /opt/kaspersky/kuma/victoria-metrics
to the following directories:
- /opt/kaspersky/kuma/core.moved
- /opt/kaspersky/kuma/grafana.moved
- /opt/kaspersky/kuma/mongodb.moved
- /opt/kaspersky/kuma/victoria-metrics.moved
After you have verified that the Core was correctly migrated to the cluster, these directories can be deleted.
If you encounter problems with the migration, analyze the logs of the core-transfer migration task in the kuma namespace in the cluster (this task is available for 1 hour after the migration).
If you need to perform migration again, you must convert the names of the /opt/kaspersky/kuma/*.moved directories back to their original format.
If an /etc/hosts file with lines not related to addresses in the range 127.X.X.X was used on the Core host, the contents of the /etc/hosts file from the Core host is entered into the CoreDNS ConfigMap when the Core is migrated to the Kubernetes cluster. If the Core is not migrated, the contents of /etc/hosts from the host where the primary controller is deployed are entered into the ConfigMap.
