How to collect traces and enable or disable maximum trace level in Kaspersky Security for Virtualization 6.x Agentless
This article concerns:
- Kaspersky Security for Virtualization 6.1 Agentless
- Kaspersky Security for Virtualization 6.0 Agentless
How to enable or disable maximum trace level
To enable or disable maximum trace level for the application, connector and Network Agent, add option -d with value 1 or 0 correspondingly to the command:
- To enable maximum trace level:
/opt/kaspersky/ksv/libexec/logcontrol.sh -d1
- To disable maximum trace level:
/opt/kaspersky/ksv/libexec/logcontrol.sh -d0
How to enable or disable maximum trace level and writing into the system log
To enable or disable maximum trace level and writing into the system log for the application, connector and Network Agent, add options -d and -s with values 1 or 0 correspondingly:
- To enable maximum trace level and logging into the system log:
/opt/kaspersky/ksv/libexec/logcontrol.sh -d1 -s1
- To disable maximum trace level and logging into the system log:
/opt/kaspersky/ksv/libexec/logcontrol.sh -d0 -s0
How to collect traces for the administration plug-in
On the computer with the Administration console and a main or client administration plug-in installed:
- Open the registry editor.
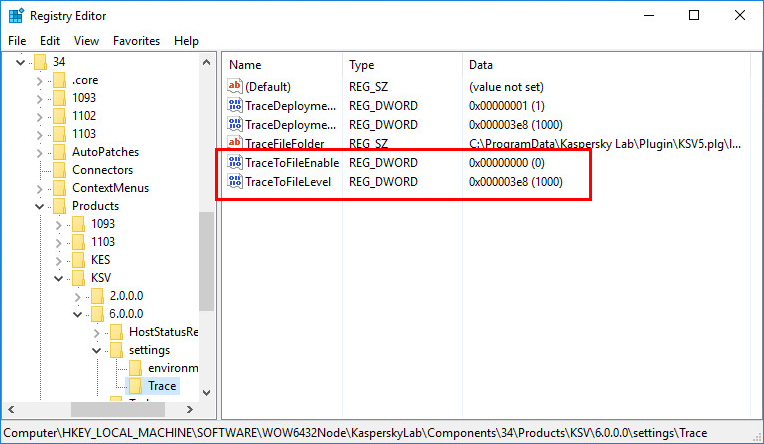
- Go to the section:
- For the main administration plug-in:
- For 64-bit systems: HKEY_LOCAL_MACHINE/SOFTWARE/WOW6432Node/Kaspersky Lab/Components/34/Products/KSV/6.0.0.0/settings/Trace
- For 32-bit systems: HKEY_LOCAL_MACHINE/SOFTWARE/Kaspersky Lab/Components/34/Products/KSV/5.0.0.0/settings/Trace
- For the client administration plug-in:
- For 64-bit systems: HKEY_LOCAL_MACHINE/SOFTWARE/WOW6432Node/Kaspersky Lab/Components/34/Products/KSVT/6.0.0.0/settings/Trace
- For 32-bit systems: HKEY_LOCAL_MACHINE/SOFTWARE/Kaspersky Lab/Components/34/Products/KSV/5.0.0.0/settings/Trace
- For the main administration plug-in:
- Change the value of TraceToFileEnable to 1 and set the trace level value TraceToFileLevel from 0 to 1000

- Reproduce the issue.
- Change the value of TraceToFileEnable to 0.
The trace file will be created in the folder %Program Files%\Kaspersky Lab\Kaspersky Security Center\Plugins\KSV6.plg\ under the name trace.log.
How to collect traces for the File Threat Protection component
- Open the ksv.cfg file for editing:
mcedit /etc/opt/kaspersky/ksv/ksv.cfg
- In the [process] section, set the value trace-level = 1000.
- To save the changes, press F2 on the keyboard.
- Restart the service of File Threat Protection component:
/etc/init.d/ksv restart
- Restart the Network Agent on the SVM:
/etc/init.d/klnagent64 restart
- Reproduce the issue.
- In the ksv.cfg file, change the value to trace-level = 0 to stop collecting detailed logs.
- Restart Network Agent and the File Threat Protection service.
Traces will be saved to /var/log/ksv.
By default, File Threat Protection traces are saved to the system log.
How to collect traces for the Network Threat Protection component
- Open the ksv.cfg file for editing:
mcedit /etc/opt/kaspersky/ksvns/ksv.cfg
- In the [process] section, set the value trace-level = 1000.
- To save the changes, press F2 on the keyboard.
- Restart the service of Network Threat Protection component:
/etc/init.d/ksvns restart
- Restart the Network Agent on the SVM:
/etc/init.d/klnagent64 restart
- Reproduce the issue.
- In the ksv.cfg file, change the value to trace-level = 0 to stop collecting detailed logs.
- Restart the service of Network Threat Protection component.
Traces will be saved to /var/log/ksv.
By default, Network Threat Protection traces are saved to the system log.
How to get trace files for Connector
- Open the connector.conf file for editing:
- On the SVM with the File Threat Protection component:
mcedit /etc/opt/kaspersky/ksv/connector.conf
- On the SVM with the Network Threat Protection component:
mcedit /etc/opt/kaspersky/ksvns/connector.conf
- On the SVM with the File Threat Protection component:
- Set the value traceLevel = 1000.
- To save the changes, press F2 on the keyboard.
- Restart the Network Agent on the SVM:
/etc/init.d/klnagent64 restart
- Reproduce the issue.
- Stop collecting traces by setting the value to trace-level = 0 in the connector.conf file.
- Restart Network Agent.
Traces will be saved to /var/log.
How to collect trace files for Network Agent
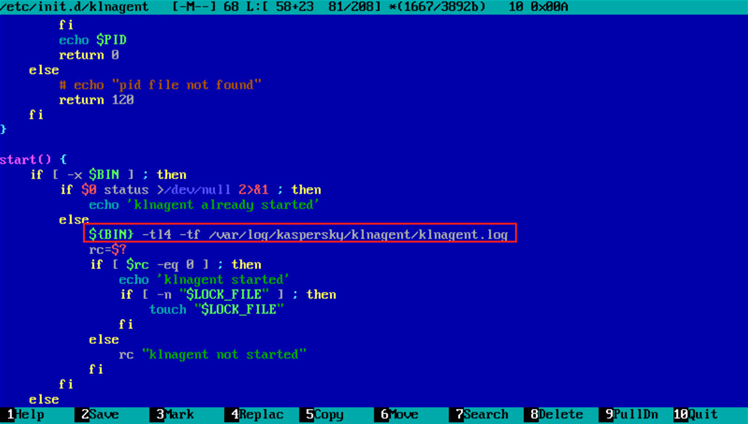
- Open the klnagent file for editing:
- In the klnagent file, replace ${BIN} in the start() function to ${BIN} -tl4 -tf /var/log/kaspersky/klnagent/klnagent.log

- To save the changes, press F2 on the keyboard.
- Restart the Network Agent on the SVM:
- Reproduce the issue.
- To disable tracing, replace ${BIN} -tl4 -tf /var/log/kaspersky/klnagent/klnagent.log in the start() function with ${BIN}
- Restart Network Agent.
Traces will be saved to /var/log.
