How to install Kaspersky Security for Virtualization 6.x Agentless in an infrastructure managed by VMware NSX-V Manager
Get maximum benefit from Kaspersky solutions
This article concerns:
- Kaspersky Security for Virtualization 6.1 Agentless
- Kaspersky Security for Virtualization 6.0 Agentless
Before installing the application, make sure that:
- SVM (Secure Virtual Machine) images are received from a trusted source. See this article for instructions.
- Agent VM Settings are configured for each hypervisor: network and storage for service virtual machines and the SVM. To learn more about configuring Agent VM Settings, see VMware documentation.
To install Kaspersky Security for Virtualization 6.x Agentless in an infrastructure managed by VMware NSX-V Manager, complete 9 steps listed below using the VMware vSphere Client console.
1. Deploy Guest Introspection
In the infrastructure managed by the VMware vCenter server and VMware NSX Manager, deploy the Guest Introspection service for each VMware hypervisor cluster that will later deploy SVMs with the Network Threat Protection components:
- Go to Networking and Security → Installation and Upgrade → Service Deployment.
- Click Add to start the Deployment Wizard for network services and protection services for virtual machines.
- Select the Guest Introspection service and click Next.
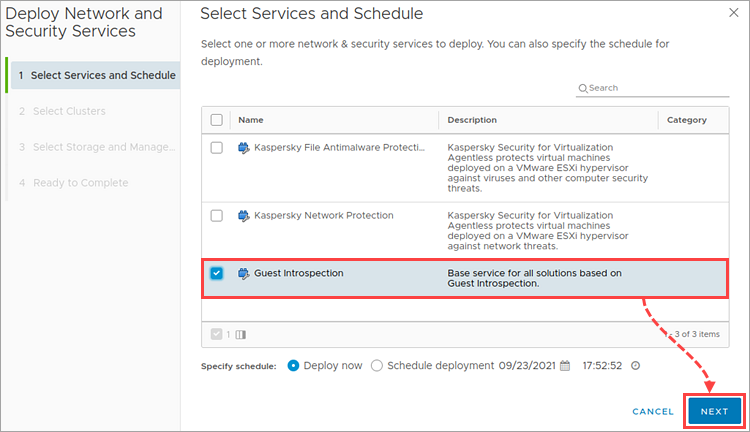
- Select one or several VMware clusters to install SVMs with File Threat Protection components. Click Next.
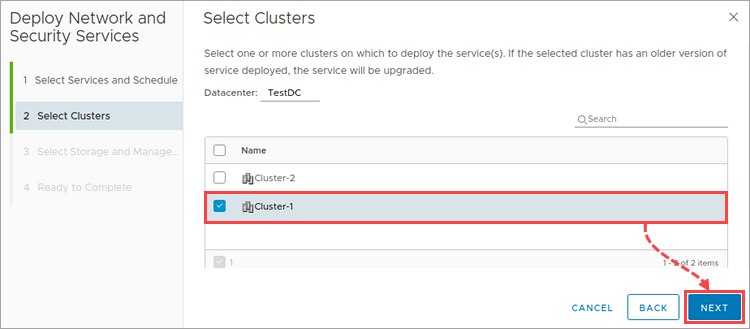
- If necessary, you can change the default network settings and select the storage for Guest Introspection service virtual machines, which will be installed on the selected VMware clusters.
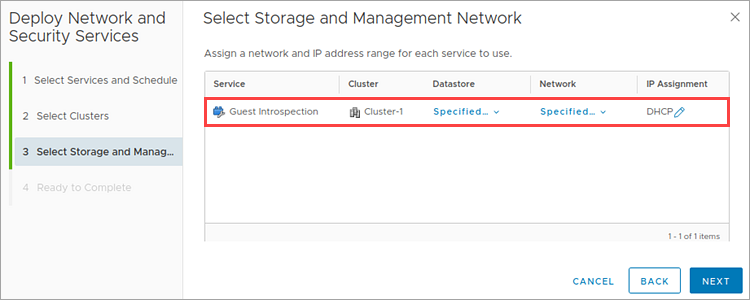
- Select the network to be used by the Guest Introspection service virtual machines and the storage for deploying these VMs.
- If you want to configure the parameters for assigning IP addresses for service virtual machines, click the corresponding icon in the IP Assignment column.
-
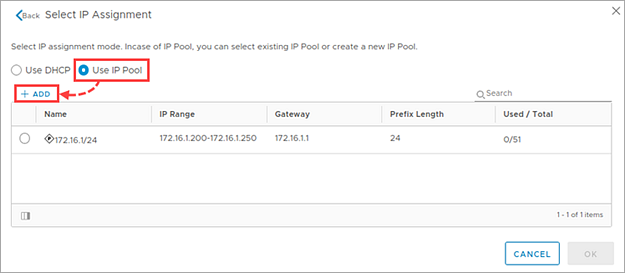
Select Use IP Pool and then click Add.
-
Configure the pool of static addresses and click Save.
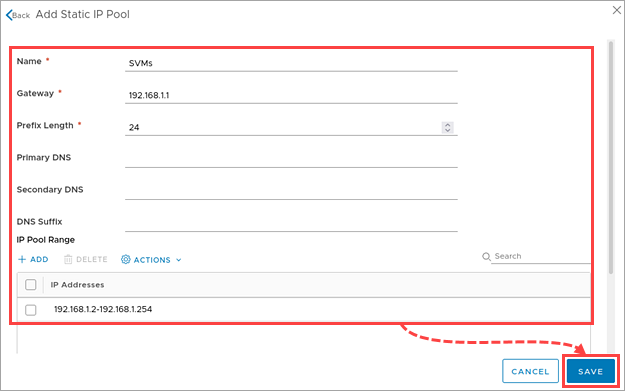
-
Select the added pool of static addresses and click OK.
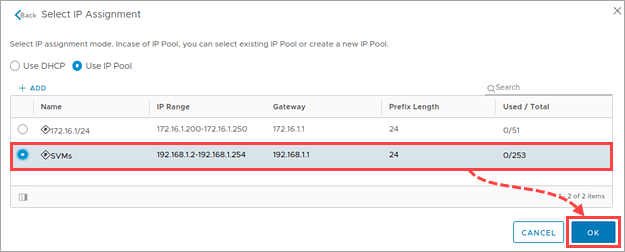
-
The name of the selected pool will appear in the IP Assignment column. Click Next.
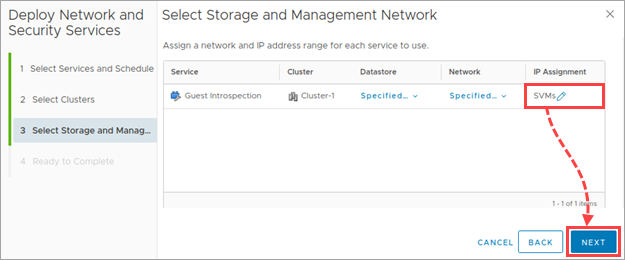
- Make sure that all parameters are configured correctly. Click Finish.
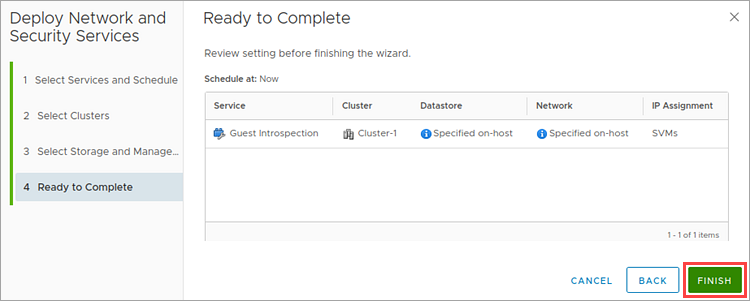
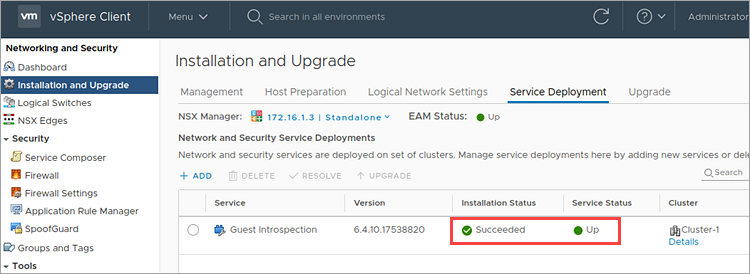
The Wizard window will close. The current status of the Guest Introspection service deployment will appear in the Installation Status column.
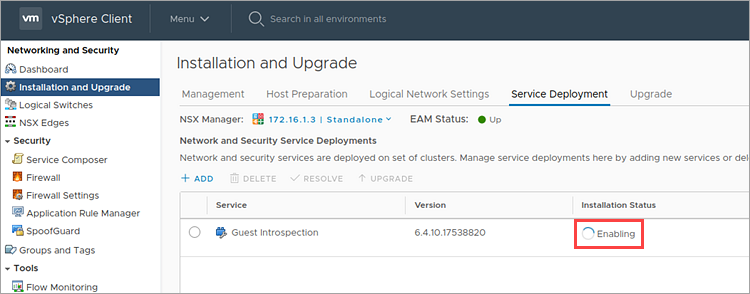
- Wait until the Guest Introspection service has been deployed.
- Go to Hosts and Clusters.
- Make sure that the Guest Introspection service virtual machines have been deployed successfully on each hypervisor in the cluster you selected.
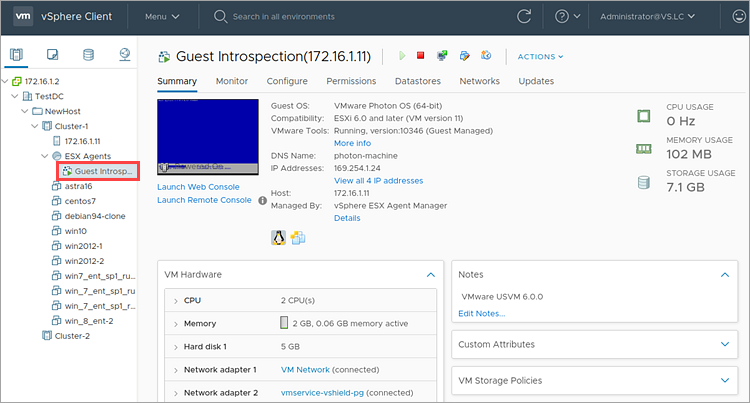
The Guest Introspection service will be deployed on each hypervisor included in the cluster.
2. Prepare VMware ESXi hypervisors for Network Threat Protection deployment
Install VMware NSX components:
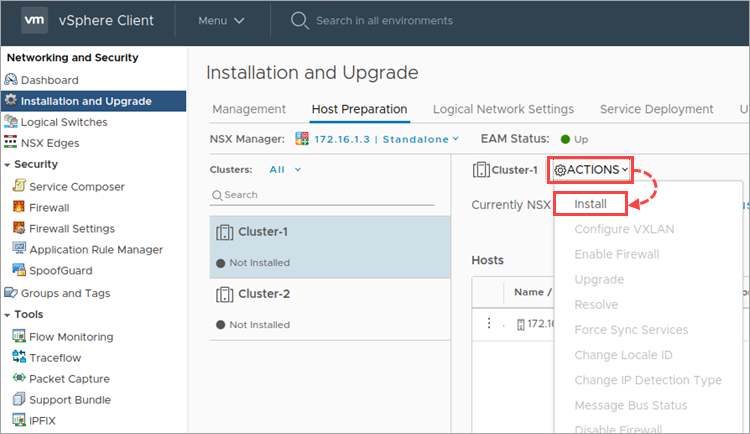
- Go to Networking and Security → Installation and Upgrade → Host Preparation.
- Choose the cluster with the hypervisors on which you want to deploy SVMs with the Network Threat Protection component.
- Click Actions → Install.
- Click Yes.
Hypervisor preparation status will appear.
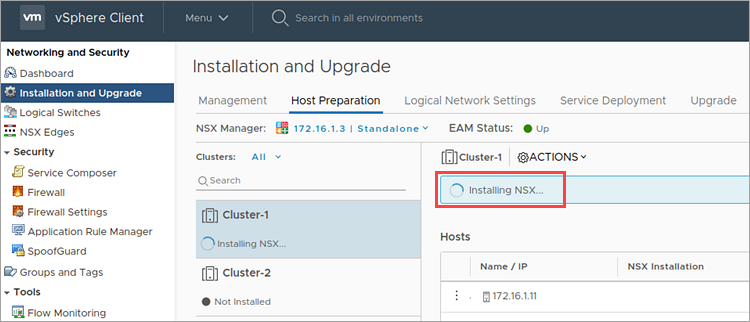
- Wait until the hypervisors are prepared.
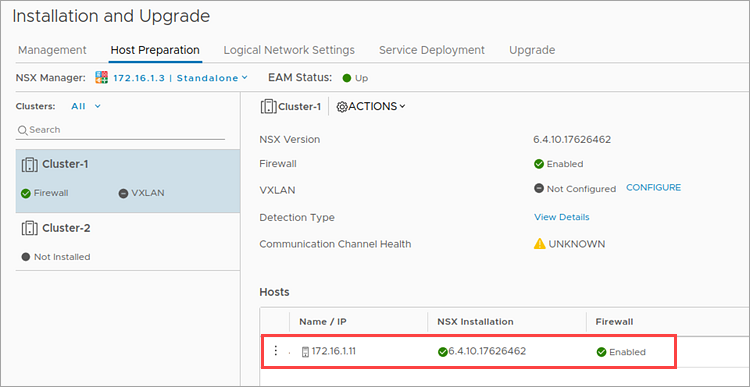
The information about installed VMware NSX components can be found in the Hosts section.
3. Read the license information for NSX for vSphere
To use the Network Threat Protection component, an active license for NSX for vSphere Advanced or NSX for vSphere Enterprise is required.
A standard license for NSX for vSphere is added by default upon connecting VMware NSX-V Manager to the VMware vCenter Server. If you use a standard license, the Network Service Insertion (Third Party Integration) feature, which is required for enabling Network Threat Protection on VMware ESXi hypervisors, is unavailable.
To view the information about the licenses in use:
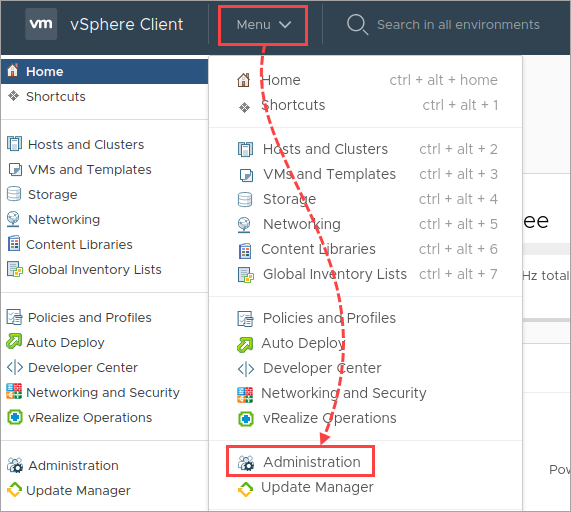
- Go to Menu → Administration.
- Select Licenses → Assets → Solutions.

If the licenses for NSX for vSphere Advanced or NSX for vSphere Enterprise are missing from the list, install the license using the corresponding wizard.
4. Register Kaspersky Security services in VMware NSX-V Manager
To register Kaspersky Security services in VMware NSX-V Manager:
- Publish all the SVM images with Kaspersky Security for Virtualization 6.x Agentless components on a file server with network access via HTTP or HTTPS. You can use the IIS web server integrated in Windows.
- Install Kaspersky Security Center components: management plugin, the Integration Server console and the Integration Server. See the Online Help page for instructions.
- Specify the settings of the Integration Server connection to VMware vCenter Server. See the Online Help page for instructions.
- Enter the settings required for registration and deployment of Kaspersky Security services in the Wizard that is started from the Integration Server Console. See the Online Help page for instructions.
Kaspersky Security services will be registered in VMware NSX-V Manager.
5. View the list of registered services
The Integration Server registers Kaspersky Security for Virtualization 6.x Agentless services in VMware NSX Manager. The Integration Server is registered in VMware NSX Manager as Kaspersky Service Manager.
To view the list of registered services, go to Networking and Security → Service Definitions → Services.
The table will contain:
- Name. The name of the Kaspersky File Antimalware Protection service and/or Kaspersky Network Protection service.
- Version. The version of the SVM image, the path to which you have specified in the Integration Server Console.
- Service Manager. Kaspersky Service Manager name (the Integration Server registered in VMware NSX Manager).
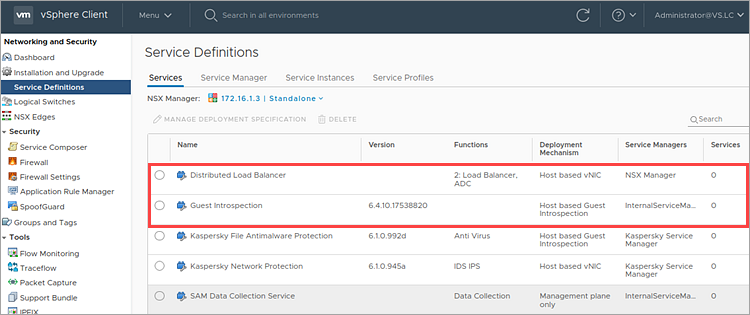
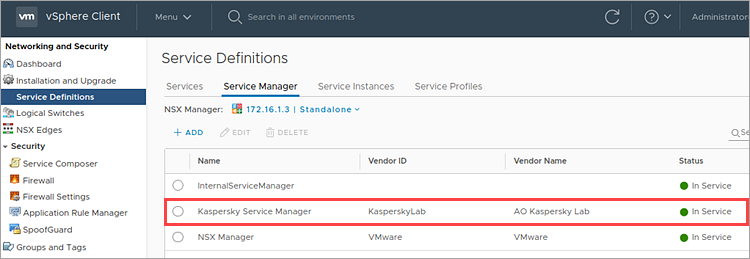
To view the list of Service Managers, go to Networking and Security → Service Definitions → Service Manager.
The table will contain:
- Name. Kaspersky Service Manager name (Integration server, registered in VMware NSX Manager).
- Vendor ID. Kaspersky Lab ID.
- Vendor Name. АО Kaspersky Lab name.
6. Configure NSX Groups
Add the virtual machines you want to protect with Kaspersky Security for Virtualization 6.x Agentless to one or several NSX Groups. To do so, create NSX Groups and configure the rules for adding virtual machines to a group:
- Dynamically. The group will include all the virtual machines that meet the specified criteria.
- By selecting VMware management objects. You can select the objects that should be added to the group. For example, a Datacenter object, a VMware cluster, a resource pool, оr specific virtual machines. By default, all child objects of the specified VMware management object are added to the group. You can also specify the VMware management objects that should not be added to the NSX Group.
You can combine these options when configuring the rules of adding SVMs to the NSX Group. For example, you can select adding the VMs to the group according to specified parameters dynamically and also specify the VMware management objects to be excluded from the group.
To configure the NSX Group:
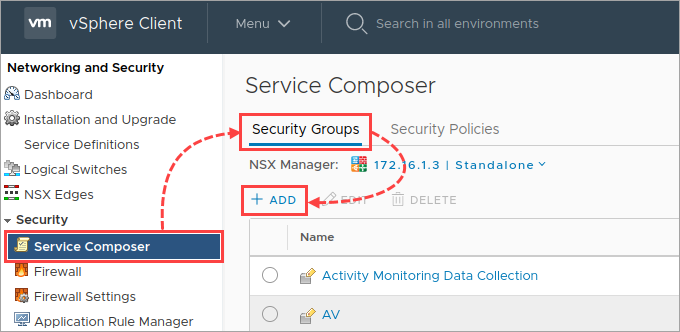
- Go to Networking and Security → Service Composer → Security Groups.
- Click Add.
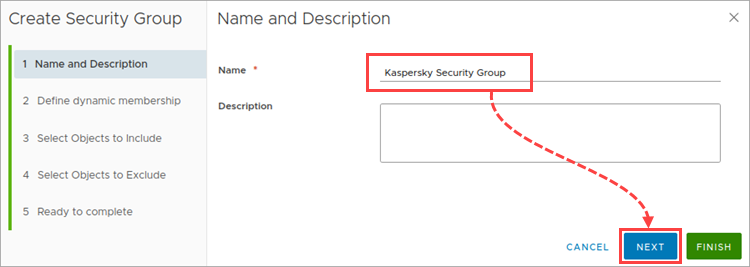
- Enter a name for the new NSX Group. For example: Kaspersky Security Group or Protected by Kaspersky.
- Click Next.
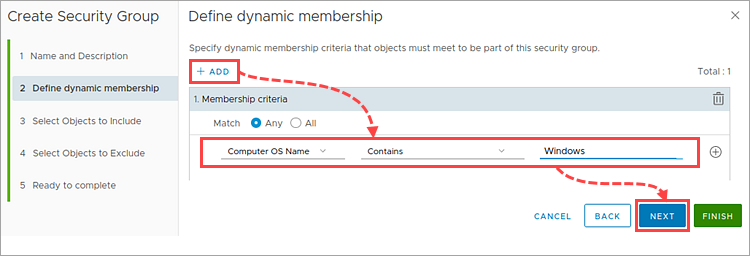
- If you want to add virtual machines to the group dynamically, proceed to the Define dynamic membership step and do the following:
- Click Add.
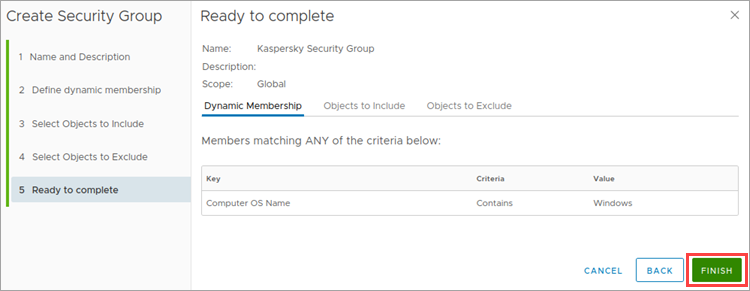
- Adjust the criteria for adding the VMs to the group. For example, if you want to add to the group all the virtual machines running Windows, set the Computer OS Name, Contains, Windows criteria.
- Click Next.
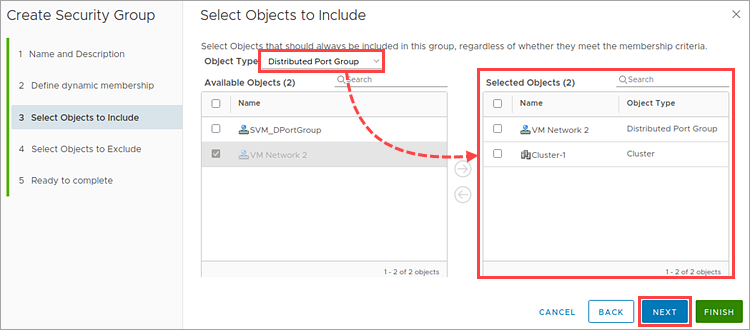
- If you want to specify the VMware management objects to be added to the NSX Group, proceed to the Select Objects to Include step and do the following:
- Select the object type in the Object Type field.
- Move all the VMware management objects you want to include in the group to the Selected Objects list.
- Click Next.
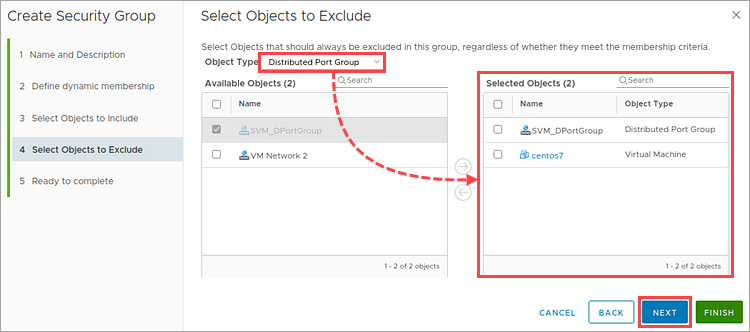
- If you want to specify the VMware management objects to be excluded from the NSX Group, proceed to the Select Objects to Exclude step and do the following:
- Select the object type in the Object Type field.
- Move all the VMware management objects you want to exclude from the group to the Selected Objects list.
- Click Next.
- To check the specified parameters, proceed to the Ready to complete step.
- Make sure that all parameters are configured correctly. Click Finish.
- Go to Hosts and Clusters and make sure that the virtual machines you want to protect are included in the NSX Group.
- Make sure that the NSX Group name is displayed for each virtual machine meeting the inclusion criteria in the Summary tab of the Security Group Membership section.
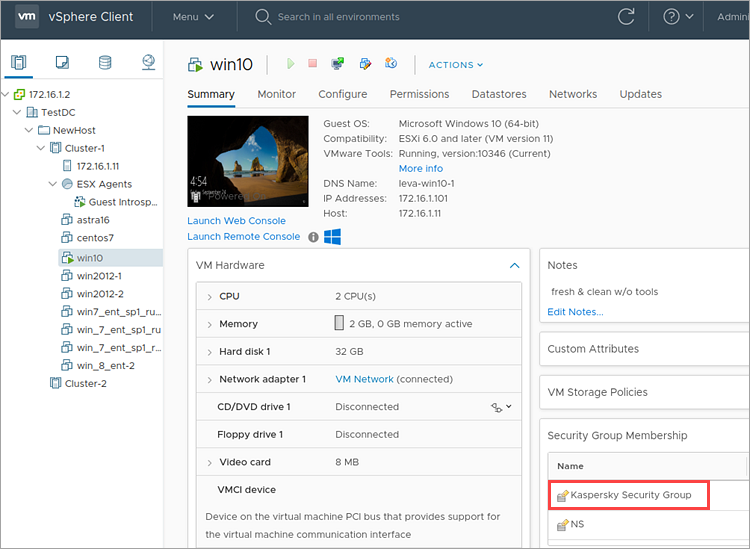
The NSX Groups will be configured.
7. Configure NSX Policies
To protect the virtual machines in the NSX Group, configure the NSX Policy and apply it to the NSX Group:
- Go to Networking and Security → Service Composer → Security Policies.
- Click Add.
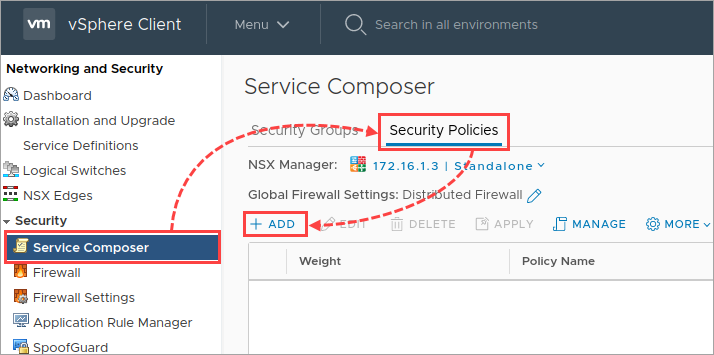
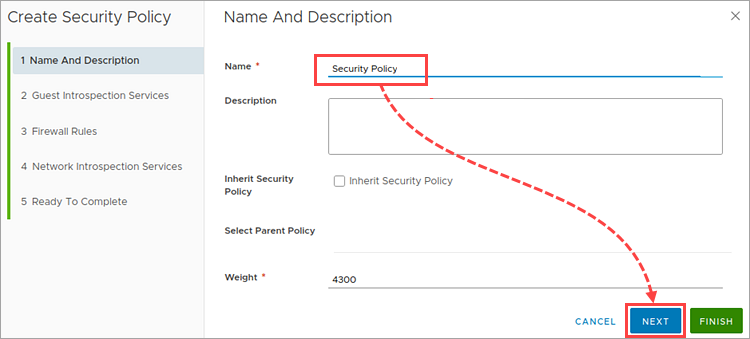
- Enter the NSX Policy name and click Next.
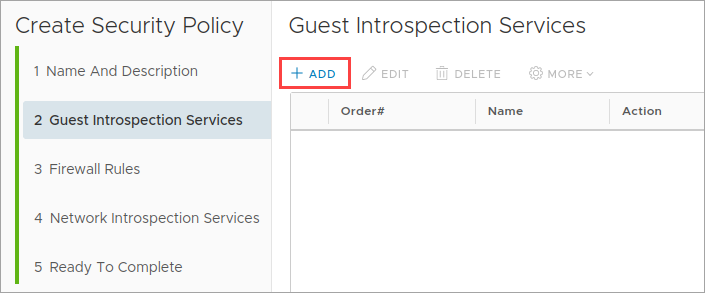
- If you want to use the File Threat Protection component, click Add.
- Type the name into the Name field and select the Kaspersky File Antimalware Protection service in the Service Name drop-down list. Click OK.
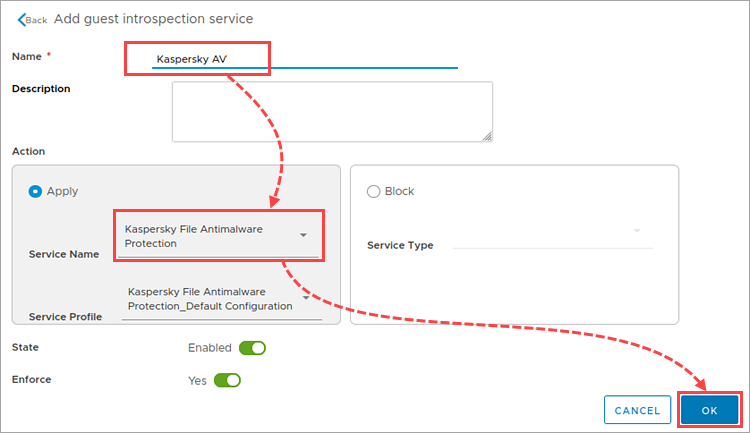
Information about the Kaspersky File Antimalware Protection service will appear in the Policy Wizard window.
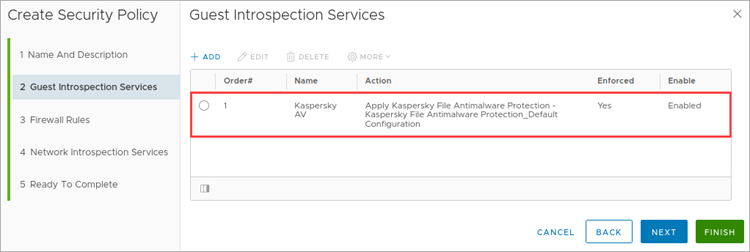
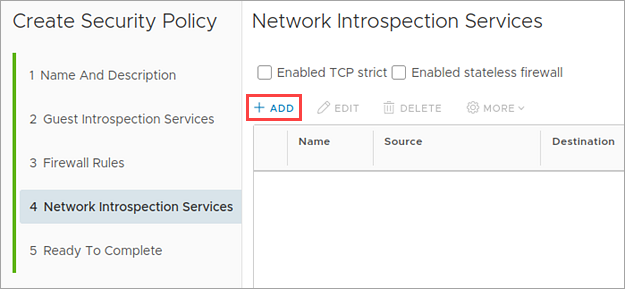
- If you want to use the Network Threat Protection component, proceed to the Network Introspection Services tab.
- To monitor the outbound traffic of the virtual machines:
Click Add.
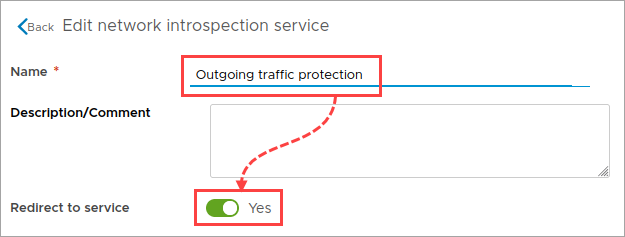
- Type the name into the Name field and in the Service Name drop-down list select the Kaspersky Network Protection service.
- Set the Redirect to service toggle to Yes.
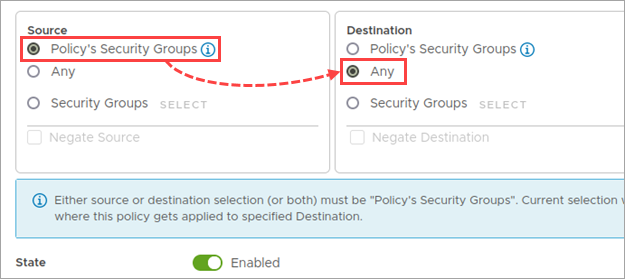
Select Policy's Security Groups in the Source section and Any in the Destination section.
- Click OK.
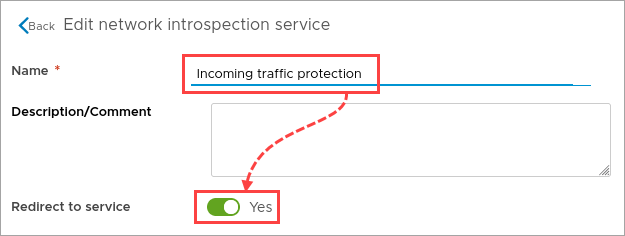
- To monitor the incoming traffic of the virtual machines:
- Click Add.
- Type the name into the Name field and in the Service Name drop-down list select the Kaspersky Network Protection service.
- Set the Redirect to service toggle to Yes.
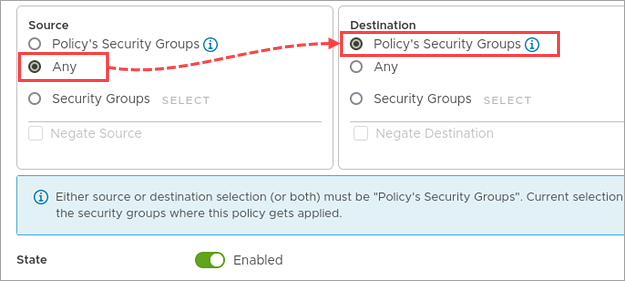
Select Any in the Source section and Policy's Security Groups in the Destination section.
- Click ОК.
Information about the Kaspersky Network Protection service will appear in the Policy Wizard window.
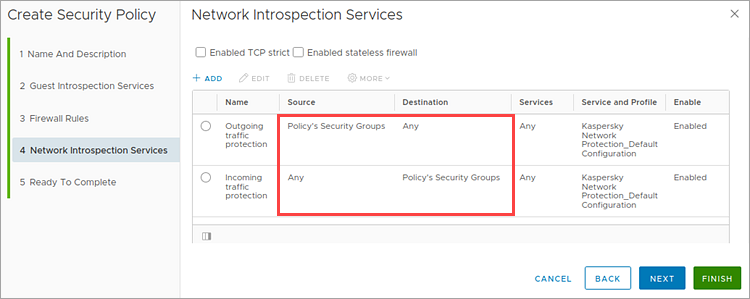
- Exit the NSX Policy Wizard.
- Go to the Security Policies tab and select the created policy. Click Apply.
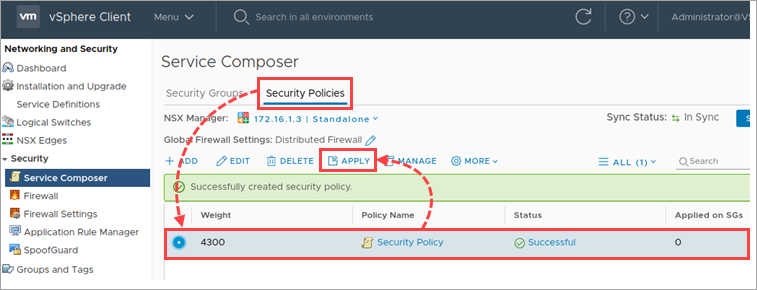
- Select the NSX Group with the protected virtual machines and click Apply.
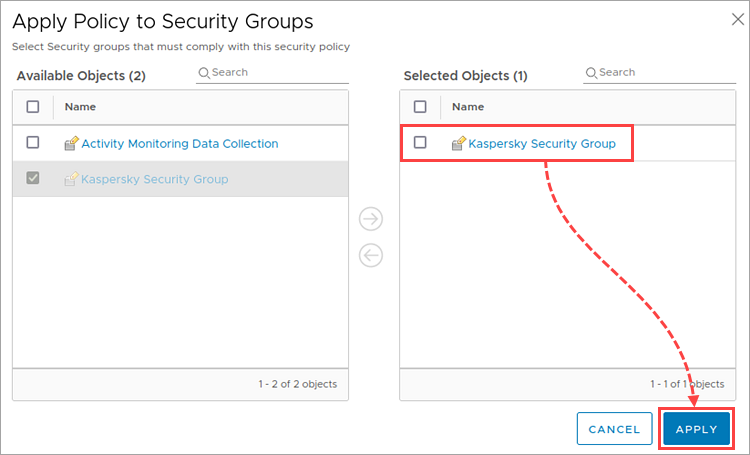
On the Security Policies tab, the Successful status will appear for the created NSX Policy in the Status column. The Applied on SGs column will display the number of the NSX Groups to which this policy is applied.

The NSX Policy will be applied to the NSX Group.
8. Deploy an SVM with the File Threat Protection component
SVMs with the File Threat Protection component are deployed on VMware ESXi hypervisors upon deploying the Kaspersky File Antimalware Protection service on the VMware vCenter clusters.
To deploy the Kaspersky File Antimalware Protection service:
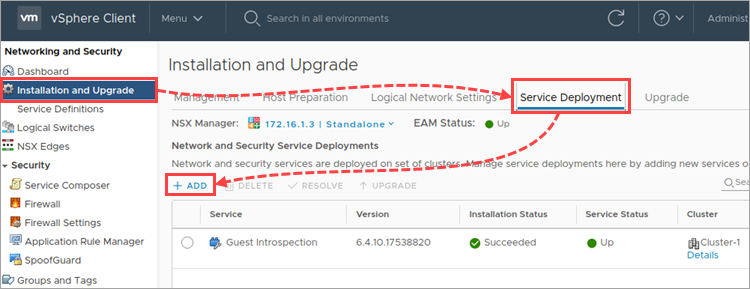
- Go to Networking and Security → Installation and Upgrade →Service Deployment.
- Click Add.
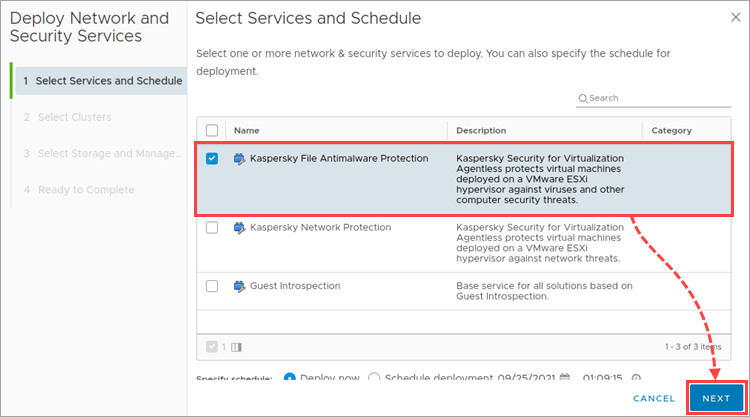
- Select the Kaspersky File Antimalware Protection service and click Next.
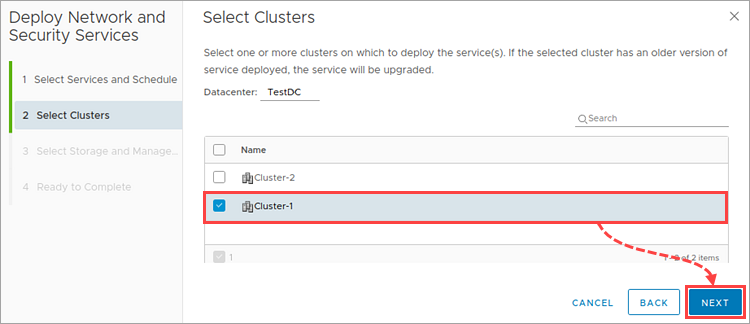
- Select one or several VMware clusters to which you want to install the File Threat Protection component. Click Next.
- If necessary, you can change the default parameters for all the SVMs that will be deployed on the hypervisors in the selected cluster.
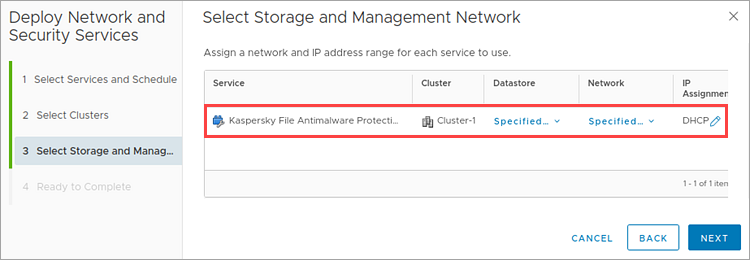
- Select the network to be used by SVMs and the storage for deploying the SVMs with the File Threat Protection component.
- If you want to configure the parameters for assigning IP addresses for service virtual machines, click the corresponding icon in the IP Assignment column.
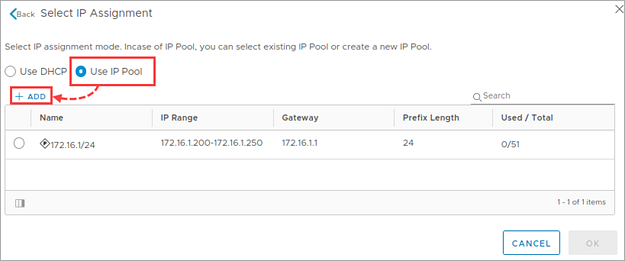
Select Use IP Pool and click Add.
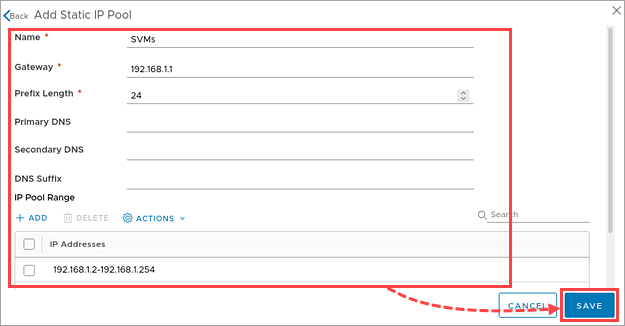
Configure the pool of static addresses and click Save.
Select the added pool of static addresses and click OK.
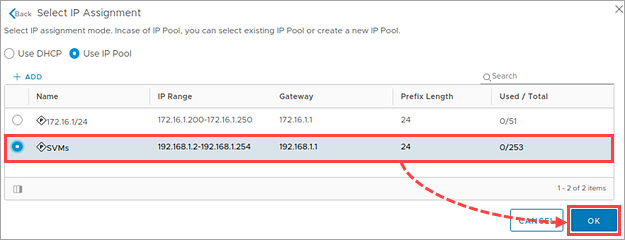
The name of the selected pool will appear in the IP Assignment column. Click Next.
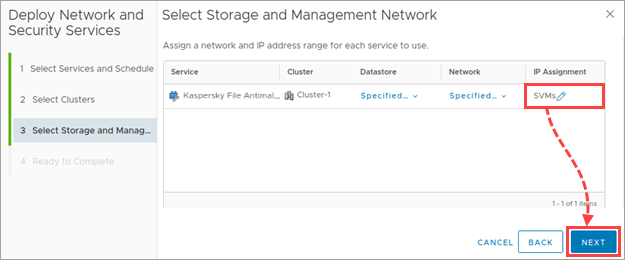
- Make sure that all parameters are configured correctly. Click Finish.
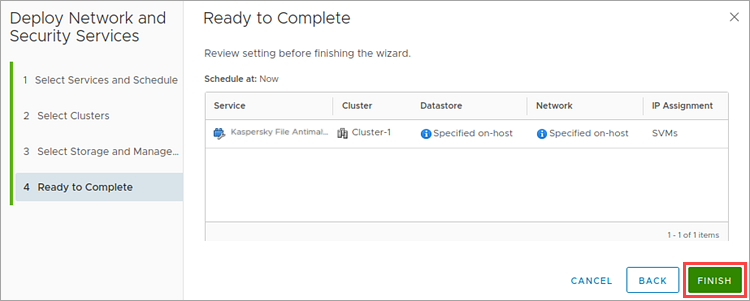
The Wizard window will close and the current status of the Kaspersky File Antimalware Protection service deployment will be shown in the Installation Status column.
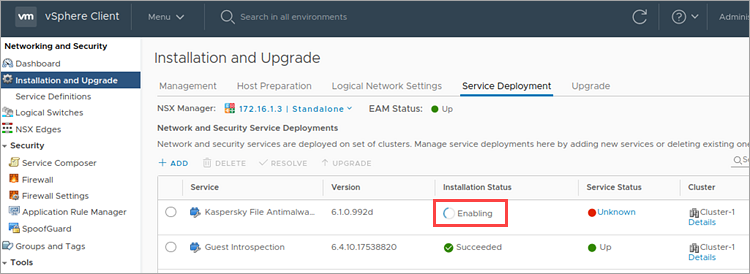
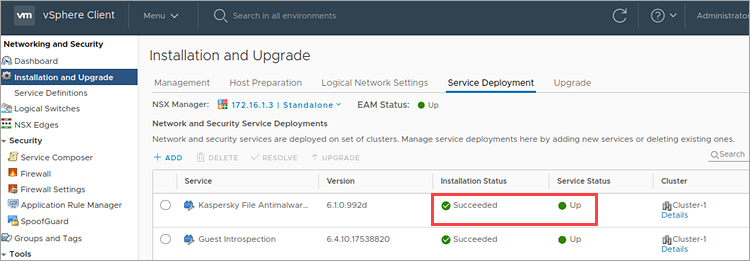
- Wait until Kaspersky File Antimalware Protection is successfully deployed.
- Go to the Hosts and Clusters node.
- Make sure that the SVMs have been deployed successfully on each hypervisor in the cluster you selected.
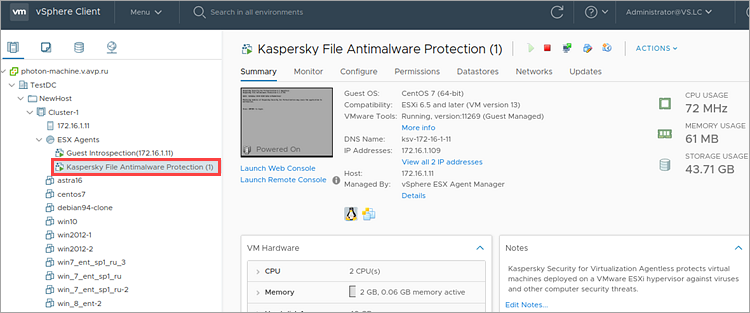
The SVMs with the File Threat Protection component will be deployed.
9. Deploy an SVM with the Network Threat Protection component
The SVMs with the Network Threat Protection component are deployed on VMware ESXi hypervisors upon deploying the Kaspersky Network Protection service on VMware clusters.
To deploy the Kaspersky Network Protection service:
- Go to Networking and Security → Installation and Upgrade → Service Deployment.
- Click Add.
- Select the Kaspersky Network Protection service and click Next.
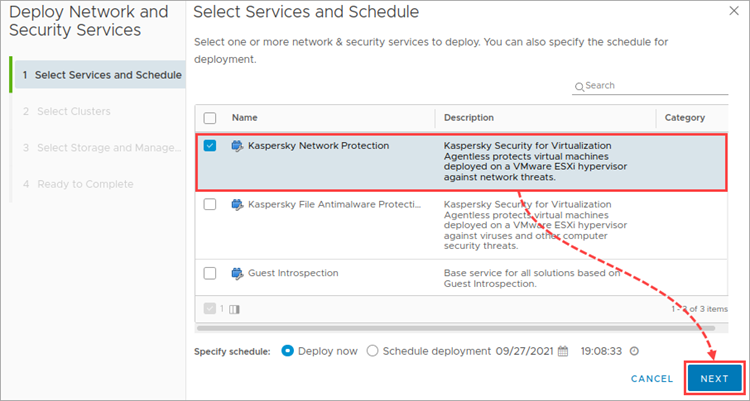
- Select one or several VMware clusters to install the Network Threat Protection component. Click Next.
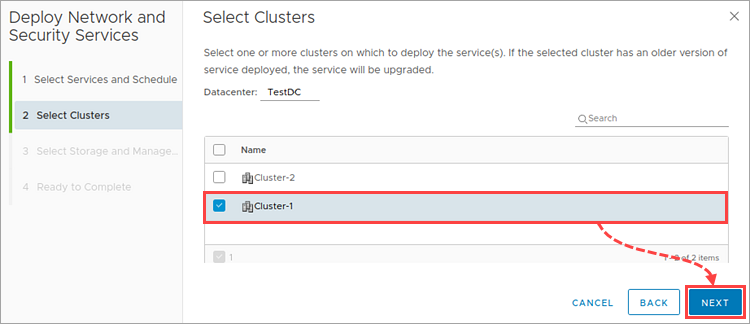
- If necessary, you can change the default parameters for all the SVMs that will be deployed on the hypervisors in the selected cluster.
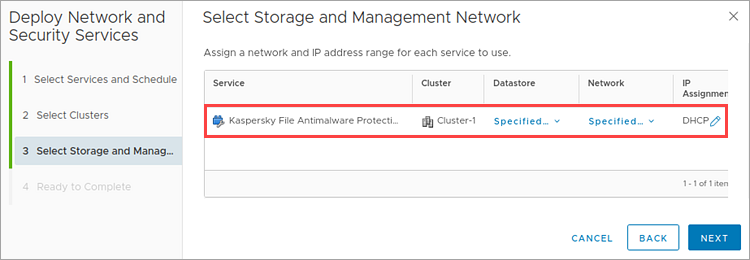
- Select the network to be used by SVMs and the storage for deploying the SVM with the Network Threat Protection component.
- If you want to configure the parameters for assigning IP addresses for service virtual machines, click the corresponding icon in the IP Assignment column.
Select Use IP Pool and then click Add.
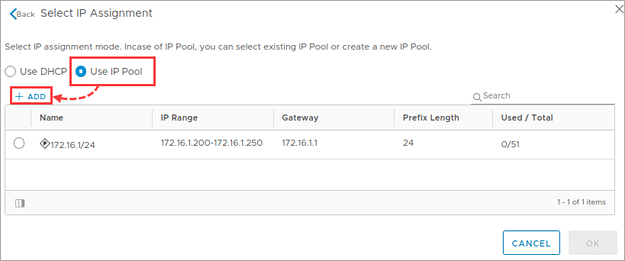
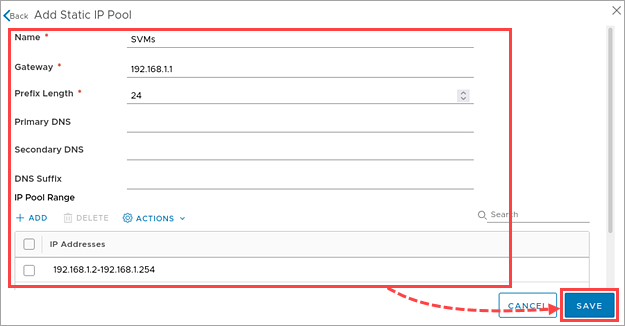
Configure the pool of static addresses and click Save.
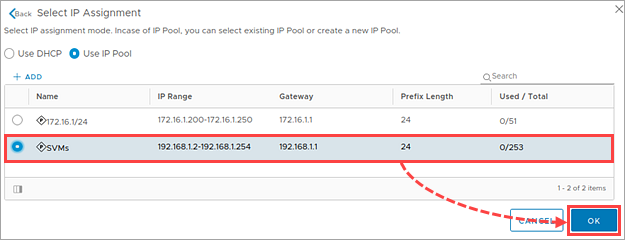
Select the added pool of static addresses and click OK.
The name of the selected pool will appear in the IP Assignment column. Click Next.
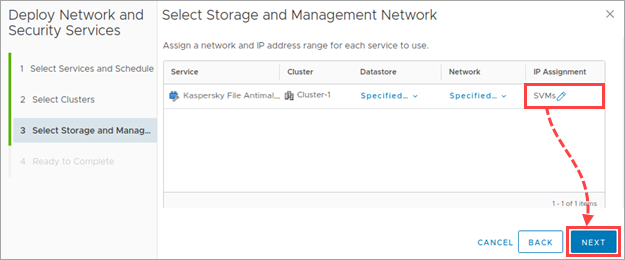
- Make sure that all parameters are configured correctly. Click Finish.
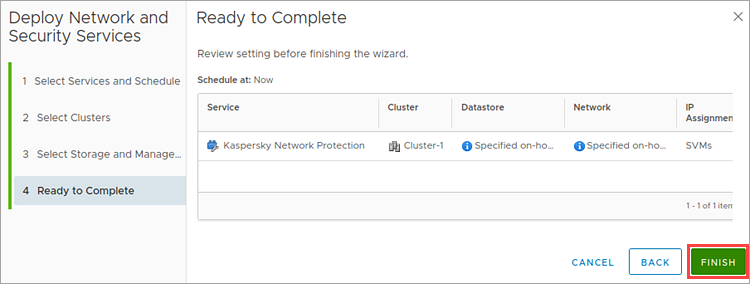
The Wizard window will close and the current status of the Kaspersky Network Protection deployment will be shown in the Installation Status column.
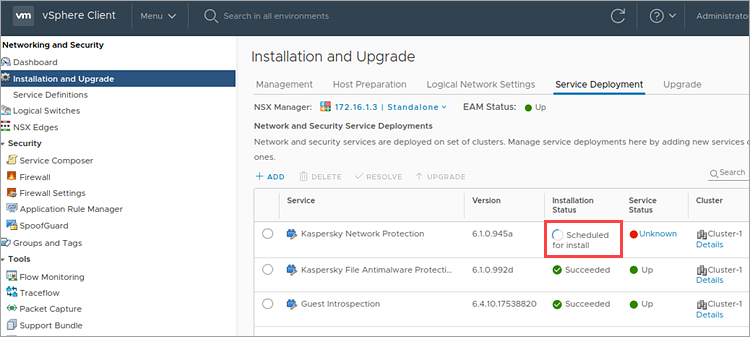
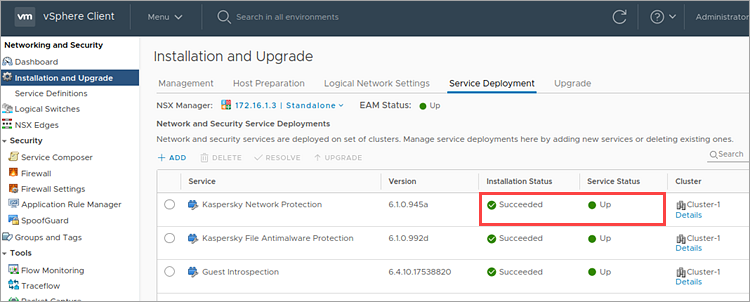
- Wait until Kaspersky Network Protection is successfully deployed.
- Go to the Hosts and Clusters node.
- Make sure that the SVMs have been deployed successfully on each hypervisor in the cluster you selected.
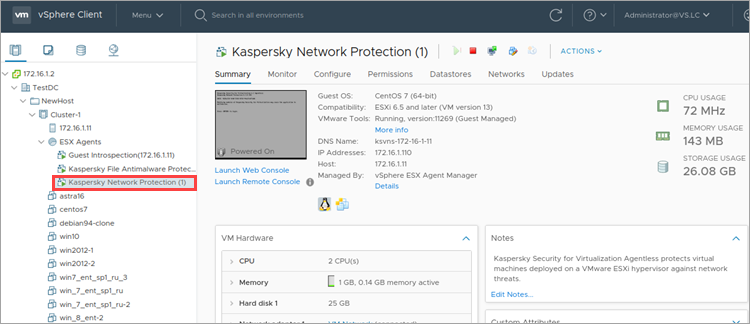
The SVMs with the Network Threat Protection component will be deployed.
